Revit Lookup Table Hell

result=size_lookup(LookupTableName, LookupColumn,
DefaultIfNotFound, LookupValue1, LookupValue2, ..., LookupValueN)
In English?
It’s one thing abstractly to understand what lookup tables
do, and to understand how they change how families behave in projects. I recently wanted to use a lookup table in a
family I developed where there wasn’t really a template I could steal from a
library family, and found myself needing to develop the lookup table from
scratch.
I quickly found myself in lookup table hell.
Autodesk’s documentation is, frankly, awful. That’s typical of software documentation today. The gaps between developers and users of software have never been larger. I found a number of blog posts that explained pieces of the puzzle, but I think an explanation useful to the average modeler faced with the problem of doing it all alone remains to be written. Perhaps this is it, perhaps not, but here goes.
Why Use a Lookup Table At All?
Lookup tables aren’t unique to Revit, but are a common database feature. Their original function was to save processing time. The programmer of the lookup table calculates a whole bunch of data, then stores the data in a comma separated values (csv) file for later use, saving the software the problem of having to make these calculations every time it’s used. In this case, what we’re storing is family parameters.
When a family has a complex set of parameters, there are two ways the values of those parameters can be set when an instance is created: either they can be derived by parameter formulas, or they can be entered by the user. To prevent the brain damage associated with either process, we can pre-calculate the parameters for all likely instances, and store them offsite in a table, where they are pre-fetched when we load the family and looked up when the modeler uses the family.
This is useful when you are trying to model actual objects made by real-world manufacturers, rather than generic objects. Pipe fittings are the most common example of lookup table use. The relationship between (for example) the inside and outside diameters of pipes is not consistent, so a formula can’t give you an accurate set of parameters. Nominal pipe size often represents neither the actual inside nor outside diameter, so the use of nominal pipe size won’t produce an accurate instance. Since formulas aren’t useful here because of the inconsistent size relationship, the only other option is to have the modeler look up all of the relevant sizes from a manufacturer’s data sheet. With lookup tables, we do all of that in advance, and store it where Revit can recover those parameters when needed.
Architectural Elements
of Lookup Tables
We need four things to make a lookup table useful. We need:
·
- to know where the lookup table is
- family parameters that can be filled with lookup table data
- a lookup table structure that allows Revit to find the data we stored
- parameter formulas in the family that tell Revit to use the lookup table
What follows is a semi-step-by-step method for getting a
lookup table built. It’s best to do as
much as you can from within the family editor, which allows Revit to do the
linguistic formatting needed so that it can use the lookup table later. This will prevent many minor or typographic
errors which can be very hard to decipher later.
Lookup Table Location
To find a lookup table, Revit needs to know its name and location.
NAMING: When naming a lookup table (this is really important), it must have exactly the same name as the family (.rfa) file, but with a .csv extension. If you steal a library .rfa file and want to use the associated lookup table, you will have to make a copy of the lookup table and name it exactly the same as your copy of the .rfa file. If you’re not familiar with .csv’s, you can open and use them in Excel.
LOCATION: Lookup tables are stored in a common location. The specific location may depend on the Revit deployment in your organization. If you have a standard Revit installation, your lookup tables will be stored here:
C:\ProgramData\Autodesk\RVT 2016\Lookup Tables
Where “2016” will be whatever year version you are using.
There are two subdirectories, “Pipe” and “Conduit”. I don’t think it matters which one you use – you should store the lookup table based on the family category you specify when you create your .rfa.
There are two subdirectories, “Pipe” and “Conduit”. I don’t think it matters which one you use – you should store the lookup table based on the family category you specify when you create your .rfa.
Unlike with type catalogs, it doesn’t matter how you load a
family with a lookup table into a project.
Once a family is associated with a lookup table, Revit will find the
table (if it’s in the right location) and use it, no matter if you load the
family from inside your project or load it from the family editor.
Developing Family Parameters
As you lay out the references for your family, you’ll be
making parameters out of dimensions. If
you want to transfer these parameters to your lookup table, you need to make
sure you specify them properly when you create them.
“Type of Parameter” must be a size parameter. Lookup tables
are all about sizes. Use “Pipe Size” or
“Conduit Size”. You have to get this
right when you create the parameter. You
can’t fix it later, short of deleting and re-creating the parameter.
Your parameters should be instance parameters.
You have some choices here about how you develop your parameters, and the choices are strategic.
The values and formulas you enter when you’re working in the family editor don’t matter, as far as the lookup table is concerned. When a modeler creates an instance of your family, parameter values will come from the lookup table, and lookup table values are static numbers. There are no formulas or logical operators stored in lookup tables.
The lookup table is intended to store the parameters for every possible configuration of the family – if a manufacturer makes 11 sizes of fitting, your lookup table is probably going to have 11 different sets of parameters from which Revit will choose, depending on the size fitting needed by modeler.
The idea here is to model what manufacturers actually create, rather than to allow the modeler to create an instance of a family which isn’t manufactured.
The lookup table structure requires that you tell Revit what to do if the modeler wants to create an instance for which there are no lookup table data – say, if he wants to create a 5” elbow, when the manufacturer doesn’t make one. This is the DefaultIfNotFound part of the lookup table call.
If you drive your parameters with formulas when you create the family, you can point the lookup table to those formulas, and tell Revit to use them if the modeler wants an instance configuration which doesn’t exist in the lookup table. If you do that, Revit will create a credible-looking instance of your family. That may be what you want, but it may not be. It may be that you don’t want modelers to be able to model items which aren’t manufactured, so you will tell Revit to default to parameter values which will let the modeler know that this particular item isn’t manufactured. That’s a strategic choice.
Once you have your parameters established, it’s time to create the lookup table, and tell Revit where the lookup table lives.
Creating the Lookup Table
The first thing you will need to do is to create a family type. You only need one (remember, all of these
parameters are instance-driven. By
creating a family type, you are just creating a type table which you can export
as a lookup table). Tradition is to call
the type “Standard”, but you can call it anything you want.
If you look at the Family Types popup window (where you edit family parameters), you will see the bottom button in the right-hand button column, labeled “Lookup Tables….Manage”.
Click “Export”. This will pop up a “Save As” browser window, asking you where to save the table. You want to put the table wherever lookup tables are stored on your system, as described above.
Notice that the name and file type are already filled out for you. This is the advantage of doing this from the family editor, rather than creating all this stuff yourself.
Your lookup table is now created. It will have only one line of values in it, which are those associated with the “Standard” type you created. Before we delve into editing the lookup table, we should probably tell Revit where we put it, so that it can use it with your family.
Telling Revit the Lookup Table Location
We are going to change every parameter that uses lookup table data (later) so that it has a formula which tells it to use the lookup table. That formula won’t contain the lookup table name, but will refer to a family TYPE parameter which contains the lookup table name. This prevents you from having to tell every parameter the lookup table name.
You’re going to create a text parameter which contains the lookup table name. What you name the parameter doesn’t matter – but remember, you’re going to be typing it a lot, so don’t make it too lengthy. Usually, the parameter is named something like “Pipe Size Lookup”, or something like that, but the name doesn’t matter. It is the text in the value column which matters, and must be the exact file name of the lookup table. I’m going to shorten the name of my text parameter to make it easier to type, and to prevent a little confusion in explanation later. I’m going to call it “Pipe CSV”. I know that lookup tables are CSV files, so I’ll remember what this parameter is for later. My parameter should look like this:
Parameter Value
Pipe CSV Manhole
ABS
Where “Manhole ABS” is the exact name of my lookup table,
which Revit assigned it because my .rfa file is called “Manhole ABS”.
Revit knows where to find the lookup table, because you stored it in the right place, so it doesn’t need a path. It stored it as a .csv file, so it doesn’t need the file extension. All it needs is the name.
Now Revit knows to associate the parameters you want with the lookup table. You just need to tell Revit now which family parameters are going to use the lookup table, and what values they will pull from it.
Lookup Table Logic
To stay on the rails, we need to know how lookup tables are
structured, and how Revit uses them. If
we understand that, the rest of this is pretty easy. If we don’t get it, it’s a hair-pulling,
teeth-gnashing experience.
Let’s start with how Revit uses a lookup table, then the structure of the table will seem a little more logical.
Let’s say that I have a pipe elbow family which uses a lookup table, and I want to create an instance of a 4” elbow.
Let’s start with how Revit uses a lookup table, then the structure of the table will seem a little more logical.
Let’s say that I have a pipe elbow family which uses a lookup table, and I want to create an instance of a 4” elbow.
A 4” elbow has a number of other parameters that always go along with it: an outside radius, a bend radius, and perhaps some other things that are specific to 4” bends of this type. The values of these are stored in the lookup table, all in one row, something like this:
(Key
field) ( Values we want to look up )
Nom Size Outside Diameter Bend Radius
Nom Size Outside Diameter Bend Radius
4 4.125 8.250
In this little table, the outside radius and bend radius are
the values we want to look up, so that we can feed them into our parameters.
The nominal size is what we know, and we want the values associated with that particular size. In this table, the first column is a key, or index, used to find the values we want, which are stored in the remaining columns to the right.
I want to make the point here that the table above contains everything that Revit needs to know in order to feed the desired values into your parameters. This isn’t formatted in "lookup table-ese" yet, but the information is there.
Let’s parse the portion of the lookup command that is relevant here, and see what Revit is doing with that command:
(LookupTableName, LookupColumn, DefaultIfNotFound, LookupValue1, LookupValue2, ..., LookupValueN)
The format of the lookup command is not very informative, but the logic works.
We’ll build our lookup command, step by step,
to see how Revit uses the information in it. Our command is going to find the outside diameter of a 4" fitting from a lookup table, and return that value to the outside diameter parameter in our family.
To do this, Revit needs to know:
- Where to find the lookup table
- Which column to look in the lookup table
- Which row to look in the lookup table
We start by telling it where the lookup table is. LookupTableName has an obvious meaning, but there IS a subtlety here. Revit isn’t actually asking for the file name
of the lookup table itself. It’s asking
for the PARAMETER name of the text parameter which contains the value of the
lookup table file name. We named our
text parameter “Pipe CSV”, and this is what Revit wants here. This convention is very useful. I can name my lookup location parameter “Pipe
CSV” in every family I build, and Revit will never get confused.
It’s finding the lookup table based on the VALUE
of the text parameter, not based on its name.
So the value has to be unique – it has to match the .rfa file name, but
the name of the parameter can be universal.
By naming the parameter the same thing in every family, I’m less likely
to make mistakes. We’ll see this when we
start monkeying with our parameters.
So our lookup command, so far, looks like this:
(Manhole CSV
Now we need to tell Revit in which column to look: Lookup Column is the NAME of the column from which you want to extract the parameter value. You’re telling Revit which column to look in to find the parameter value you want. When we actually view a lookup table, the column names contain some formatting information which we don’t need here. What Revit wants is just the name, and it wants it in quotes. The name of the column we want to search in the lookup table is "Outside Diameter", so that's the next term in our command. Our lookup command, so far, looks like this:
(Manhole CSV,”Outside Diameter”
We have told Revit to look at the Manhole CSV parameter and use the lookup table listed in the value. We’ve told Revit we want to know a value from the lookup table that is somewhere in the “Ouside Diameter” column.
Now we need to tell it what row to look in. To tell Revit what row to look in, we’re going to give it the value in the key column which is associated with data we want returned. Revit doesn’t need to know which column to look in to find the key value – it’s always going to look in the first column of our table. It's going to hunt through the first column in the lookup table for a value we tell it to look for (the nominal pipe diameter, in this case). When it finds that value, it knows it's in the right row.
What we’re going to do is give Revit a value to look for in the first column of our table. It will look until it finds a match, and use the value in that row which is underneath the column header we specified.
We want Revit to return the value for an elbow which has a nominal size of “4”. Revit doesn’t need to know the name of our column, or of our “Nominal Size” parameter, or anything else. It just needs to know that it’s looking for a value of “4” in the first column of our table.
So our command now looks something like this (we’ll fill in the DefaultIfNotFound behavior in a minute):
(Manhole CSV,"Outside Diameter",[stuff we'll do later],4)
Now Autodesk’s formula contains LookupValue1 through LookupValueN, so we are not tied to one key value. We may have asymmetric bends, so that some are 4x4, some are 4x3, etc – to find the parameters for each type of bend, Revit is going to have to look for more than one value – it needs to know the diameter of each end of our bend. So let’s change our table a little to accommodate that:
( Key field ) ( Values we want to look up )
Nom Size 1 Nom Size 2 Outside Diameter1 Outside Diameter2 Bend Radius
4 2 4.125 2.098 6.125
4 3 4.125 3.103 7.187
4 4 4.125 4.125 8.250
So let’s say that we have a parameter in our family “Outside Diameter 2”, which we need to build the geometry of our instance of a 4x3
bend. Our lookup command will look like
this:
(Manhole CSV,”Outside Diameter2”,[stuff we’ll do later],4,3)
The underlined value will be returned. First we told Revit what column to find the value we want in, then we told it how to find the row: look for “4” in the first column, “3” in the second column, and return the value in the “Outside Diameter2 Column” that’s in the row where the values in the first and second columns are “4” and “3”.
This works great if we are always searching for dimensions associated with a 4x3 bend. In the real world, we are going to have our values “4” and
“3” determined by parameter values entered by the modeler – that’s how we make
these lookup values variable, and responsive to the modeler.
Let’s say that we have parameters “Nom Size1” and “Nom Size2” which need to be entered by the modeler in order to specify the fitting size. Our lookup table command now contains the names of the parameters where our lookup values can be found, rather than the values themselves:
(Manhole CSV,”Outside Diameter2”,[stuff we’ll do later],Nom Size1,NomSize2)
This formula does EXACTLY the same thing as the last one, within the lookup table. The only difference is that we’ve turned our lookup values into variables (parameter names) so that the formula will enable Revit to look for any values the modeler wants.
We’ve now tied the lookup values to parameters which are
controllable by the modeler. Notice that
the names NomSize and NomSize2 appear nowhere in our lookup table. They are the names of the family parameters
which we are telling Revit to use to give us our lookup values.
Revit doesn’t care about the column name in
which a lookup value occurs – it’s just looking for the first lookup value in
the first column, the second lookup value in the second column, etc. It already knows WHERE to look for those
values, but it needs to know WHAT values you want it to look for in order to
find the right row in the table - so it needs to know the names of the family
parameters where it can find those values.
We can have as many lookup value columns as we need – if you have a fitting which has thirty pipe stubs sticking out of it, all of which can be different sizes, you just make sure that the first 30 columns of your lookup table contains the values associated with all configurations of whatever fitting you might want to use.
Revit will look for your array of LookUpValues 1….30, starting with the first column and working rightward to column 30. When it finds an array of values that matches the array of values you gave it in the instance parameters for the fitting you want, it will return the value from that row from whatever column you told it to.
The command can only return one parameter value, but it can use as many lookup values as needed to find that one value.
What’s important is that the lookup values be fed into the command in the same order as the columns are organized in the table.
Now that we get the logic of the table, it’s time to look at the structure of an actual lookup table.
Lookup Table Structure
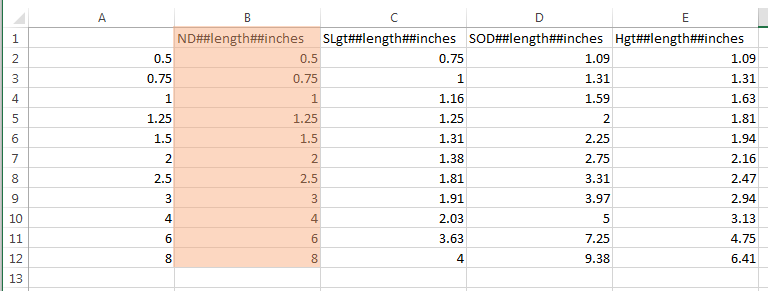
This is a lookup table – a simple one. There is no header in the first column. Revit will ignore this column. You can put anything you want in this column,
and Revit doesn’t care. This column
isn’t part of the table we constructed above when looking at the table’s
logic. This is a reference column, and
is a place where you can put information which might help you to maintain the
table later on.
The remaining columns contain data about the possible configurations of family instances, and also contain formatting information which Revit needs when plugging the data back into our parameters.
[This is another reason to export these tables out of the family editor, rather than to try to construct them from scratch. The formatting is handled by Revit, and the chance for formatting a column with incorrect units is minimized.]
The column header names were exported to match your parameter names when you exported your lookup table. As we can see from our discussion of the logic of the table, it is completely unnecessary for these column headers to match your parameter names. When you tell Revit to look up data, you’re going to tell it the name of the column to look in, and your lookup formula is already associated with the parameter value you’re looking for. The name of the column doesn’t have to match anything.
If you have a habit of
spelling out parameter names for clarity, this might be a good time to use
brevity instead. You might consider
changing the column names to something very short in order to make them easier
to type. You’ll be entering them in parameter
formulas, and shorter column names will reduce the risk of typos.
The “first” column (the first column Revit cares about) is highlighted in peach. This is a key column which provides lookup values. It is a column used to find the values which determine which row Revit uses to return the parameter value you want.
The remaining columns are *generally* the lookup columns from which Revit returns parameter values.
Remember, there may be more than one lookup value required for Revit to know which row is the right row (we already saw this with our 4x3 bend). This table has four columns. We can’t tell from looking how many of these columns are lookup value (key) columns and how many columns are lookup columns which return data. Nothing about the table determines that. Columns which are used as keys and columns which return data look exactly the same.
The question of which purpose each column serves is only answered by the lookup formula used in the family parameter. If a formula contains two lookup values, then the first two columns of the lookup table will be used as indexes to find the right row, and all remaining columns will be used to return parameter values.
Not all family parameters may require the same number of lookup values, so individual family formulas may use lookup table columns in different ways.
Finish the Table!
When you exported the lookup table from the family editor, you only had one set of parameter values, so your lookup table will initially only have one row.
To fill out the rest of the table, you will use a manufacturer’s size chart (or something like it), and fill in the rest of the chart so that there are values for every item configuration the manufacturer makes (or which you choose to have in your family).
Just be conscious of units – look at the header, and make sure that you enter every table value in the units specified in the column header, doing any conversions you need prior to data entry.
Now we have a working lookup table; Revit knows what it’s called and where to find it, and we understand the logic of it. All that remains is to create parameter formulas to feed data from the lookup table into our family parameters.
Pointing Family Parameters to the Lookup Table
It’s time to pull out our not-so-handy lookup table formula
again. This is the formula we will type
into every family parameter that needs to use the lookup table:
value = size_lookup(LookupTableName, LookupColumn, DefaultIfNotFound, LookupValue1,
LookupValue2, ..., LookupValueN)
value = size_lookup(LookupTableName, LookupColumn, DefaultIfNotFound, LookupValue1,
LookupValue2, ..., LookupValueN)
We need to enter everything after the equals sign into each
parameter in order to drive that parameter with the lookup table.
The command itself is size_lookup()
The command itself is size_lookup()
We will enter that verbatim. We now know everything that we need to know to what we need to enter next:
LookupTableName = the PARAMETER name of the text parameter which contains our lookup table file name.
LookupColumn is the name of the lookup table column, in quotes, in which we want Revit to hunt for the value we want.
LookupValues are the value(s) we want Revit to look for in
the first column (or first n columns) of our lookup table to decide which row
from which to get the parameter value we want.
In the example table above, if we have a parameter for the
outside diameter of our fitting, and the modeler specifies the fitting size in
a parameter called Nominal Diameter, our formula in our family type editor
would look like this.
size_lookup(Pipe CSV,”SOD”,[stuff we’ll do later],Nominal Diameter)
size_lookup(Pipe CSV,”SOD”,[stuff we’ll do later],Nominal Diameter)
The formula is the formula for the family parameter Outside Diameter, so it will return a value which your family will use as its outside diameter.
Pipe CSV tells it which family parameter contains the file name of the lookup table.
“SOD” tells Revit which column in the lookup table contains the Outside Diameter value we want returned (the quotes tell Revit that SOD is a text string, rather than a number).
Nominal Diameter tells Revit which family parameter contains the value we want it to look for in the first column of the lookup table, in order to determine in which row our Outside Diameter will be found.
We now need to tell Revit what to do if it cannot find the LookupValues fed to it by the modeler, and your approach goes back to your strategic desire either to cobble together an item as best you can, or to produce an item which will clearly be wrong, letting the modeler know there is no such item.
You can enter any value or formula you like in the DefaultIfNotFound field, as long as it is appropriate to the parameter type, which is “size”. You cannot enter a text string or logical value. If you enter a formula, it must return a number associated with a size (not an integer or dimensionless number).
Let’s say that we want to return a credible looking fitting
if our lookup table doesn’t contain the lookup values the modeler wants to use,
and let’s say that we’ll approximate our outside diameter to be 1.1 times the
size of the nominal diameter. We can now
enter our default behavior, resulting in a formula like this:
size_lookup(Pipe CSV,”SOD”,1.1*Nominal Diameter,Nominal Diameter)
size_lookup(Pipe CSV,”SOD”,1.1*Nominal Diameter,Nominal Diameter)
If our manufacturer doesn’t make the size fitting the
modeler wants, Revit will create one where the outside diameter is 1.1 times
the size of the nominal diameter.
Once this is done, you’re finished, and your family is ready to use, at least as far as the parameters go.
Once this is done, you’re finished, and your family is ready to use, at least as far as the parameters go.
Thanks for the tips, your post gives clear and logical explanations.
ReplyDeleteI have a question though, the generic revit fittings automatically adapt to the pipe size, I could not make this work. The user has to manually input the pipe diameter as an instance entry. Is there anyway to make these adaptable?
This is helping...
ReplyDeleteI'm trying to use the table to extract conduit size needed for quantities of different types of AV cables. Separately, for years, I have maintained and Excel spreadsheet having columns to represent diameters of cable types (published by manufacturers), rows for cable quantities (for 1 to 300+ cables, where the cells are all standard electrical trade conduit sizes. The cells do math to calculate cross-sectional area of the cable in quantity (critical for small quantities - two 1/4" cables do not fit in a 1/2" pipe), including statutory fill ratios, then the cell consults a lookup table to return the next-greatest pipe size. I figure that I can adapt the lookup process to Revit. I have to map numbers to the cable types because the lookup table only sees numbers. My question is about the data type. You say "size", whereas the documentation refers to some numerical types like number and area. But, number has no units. Really, neither do the trade sizes, just like the pipes you describe.